 by
by Adding Ansible to VRA is again a pretty simple task if you have the Enterprise Edition, there are a couple of prerequisites that need to be addressed which can be done in a few different ways but as I am running this in a lab environment so I will do the easy and less secure path. as always go and check out the official documentation for production platforms.
Prerequisites:
- Create a password file that contains the password VRA will use to connect to Ansible
- Update the Ansible.cfg file with the vault file location and setting host key checking to false
Ok so lets create the password file
mkdir /VRAPassword
echo 'Mypassword' > /VRAPassword/Password.txt

When you create the file check the permissions do not have execute on them otherwise this will not work, if they do run the chmod 644 <filename> to set them to rw as per above.
Edit the Ansible.cfg
vi /etc/ansible/ansible.cfg
Search for the correct lines using / and then the string you want to fine e.g. “host_key_checking = False” this will take to to the location below, remove the #
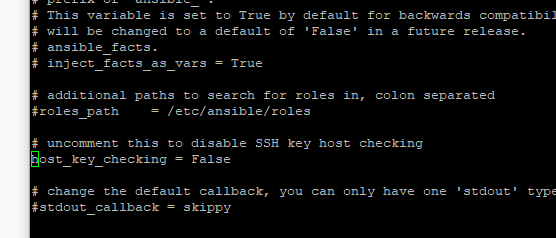
Search again / vault_password_file uncomment the line and add in the correct path, in my case /VRAPassword/password.txt

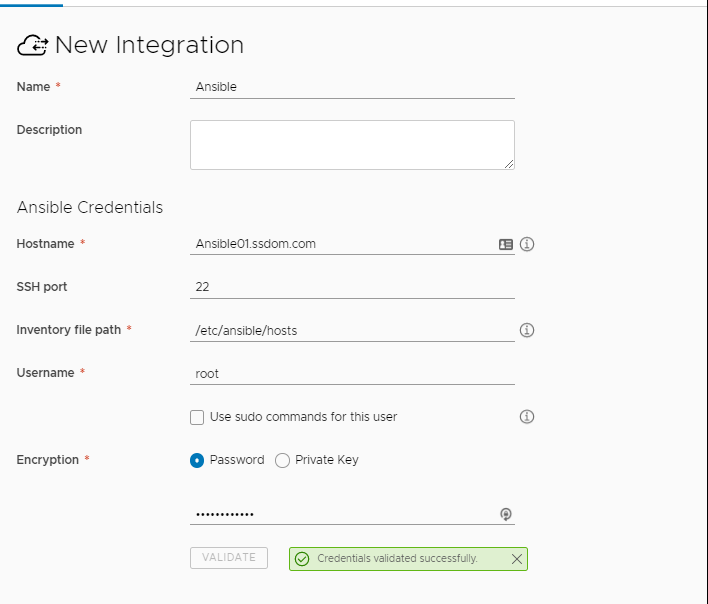
Login to VRA Portal
To add Ansoble go to Infrastucture > Connections > Integrations and click add
Fill in the details as per the below, at this point it would be a good idea to have create a user on the Ansible server for the user integration, this is my lab so root it is!
Note the Inventory path as per my other post (link) and then click validate to make sure you have things setup correctly
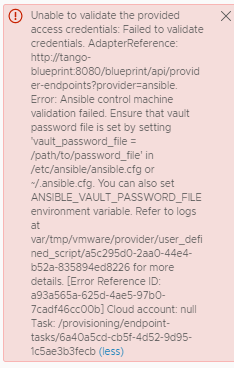
if it’s not setup right you might see an error message like below, just need to go back and check your config and paths settings, this one was the password vault file set wrong.
Ok we now have Ansible connected, what next, lets use it ! To do this i will be using playbooks in Ansible. Playbook are created in yaml format and can be used to run multiple tasks on a server or a hosts set.
We first need to setup the VRA base infrastructure configuration e.g. Flavor, Image, Networks, Compute the the below assumes this has already been done and is not covered in this post. I’m using a CentOS 7 VM template that I have a few settings pre configured like DNS, SSH….
We need to add in a couple extra settings into the ansible.cfg file
ssh_args = -o UserKnownHostsFile=/dev/null
inventory= /etc/ansible/hosts
log_path = /var/log/ansible.log
so lets create a simple playbook which again installs a web server on the CentOS. i’ve created a folder under the /etc/ansible folder called “Playbook”
mkdir /etc/ansible/Playbooks
when in the new directory create a file called Webserver.yml
vi Webserver.yml
The yaml: I’m just targeting the “Labservers” section in my ansible hosts file as before in my other post, as this is yaml it’s very sensitive to indentation and if incorrect can kick out some strange errors.
 - hosts: LabServers
   user: root
   tasks:
    - name: Install httpd
      yum:
       name: httpd
       state: present


    - name: allow all access to tcp port 80
      firewalld:
       port: 80/tcp
       zone: public
       state: enabled


    - name: allow all access to tcp port 443
      firewalld:
       port: 443/tcp
       zone: public
       state: enabled


    - name: Start httpd
      service:
       name: httpd
       state: started
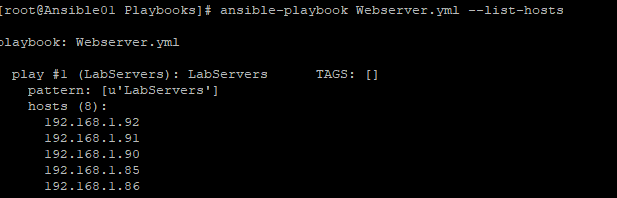
you can test that this playbook works by running the below commands from your Ansible server.
###See which hosts it will run against
ansible-playbook Webserver.yml --list-hosts

###Execute the Playbook
ansible-playbook Webserver.yml
Blueprint
Ok so now over to VRA create a new blueprint Cloud Assembly > Design > New. Add a Name and a Project and click create

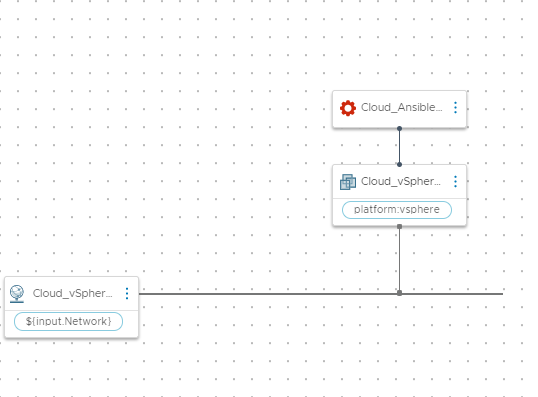
I’m focusing on a vSphere deployment for this one so I drag onto the design canvas a vSphere:Machine object a vSphere:Network and lastly a Configuration:Ansible object. you should now have the below
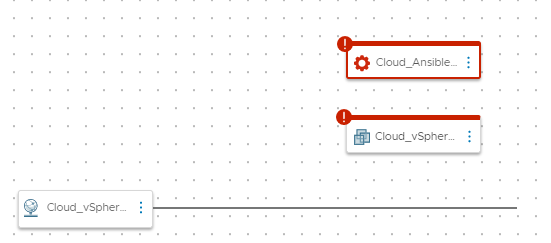
join the network to the virtual machine object by hovering over the network pulling the little o to the virtual machine object

Join the Cloud_ansible Object to the VM and edit the JSON, I’ve added the playbook that I want to use under the Playbooks section and added the path to the file e.g. /etc/ansible/Platbooks/Webserver.yaml, also added user and password. In a production environment you would not place a clear text password here but use a different method to secure the credentials.
Cloud_Ansible_1:
  type: Cloud.Ansible
  properties:
   host: '${resource.Cloud_vSphere_Machine_1.*}'
   osType: linux
   account: Ansible
   username: root
   password: <password>
   playbooks:
    provision:
     - /etc/ansible/Playbooks/Webserver.yml
Once completed you should have a blueprint that looks like this
The full JSON: this also contains a networks selection which is driven by tags

formatVersion: 1
inputs:
  Network:
  type: string
  oneOf:
    - title: Core
      const: 'network:Core01'
    - title: VRA Network
      const: 'network:VRA'
    - title: Mangement
      const: 'network:MGMT'
  title: Network Select
resources:
  Cloud_Ansible_1:
  type: Cloud.Ansible
  properties:
    host: '${resource.Cloud_vSphere_Machine_1.*}'
    osType: linux
    account: Ansible
    username: root
    password: <password>
    playbooks:
      provision:
        - /etc/ansible/Playbooks/Webserver.yml
  Cloud_vSphere_Machine_1:
  type: Cloud.vSphere.Machine
  properties:
    image: vSphere-Linux-CentOS7
    flavor: vSphere-Small
    osType: Linux
    serverType: Web
    constraints:
      - tag: 'platform:vsphere'
    customizationSpec: Linux-CentOS
    networks:
      - network: '${resource.Cloud_vSphere_Network_1.id}'
    assignment: static
 Cloud_vSphere_Network_1:
 type: Cloud.vSphere.Network
properties:
  name: Networks
  constraints:
   - tag: '${input.Network}'